Complete Guide to Shopify 3D Configuration Integration
Step-by-step technical implementation guide for adding interactive 3D product configurators to your Shopify store.
Prerequisites
Technical Requirements:
- • Shopify store (any plan)
- • Admin access to your store
- • Basic HTML/CSS knowledge
- • Product 3D models or CAD files
Recommended Tools:
- • Shopify CLI (for development)
- • Code editor (VS Code recommended)
- • 3D modeling software access
- • Testing environment
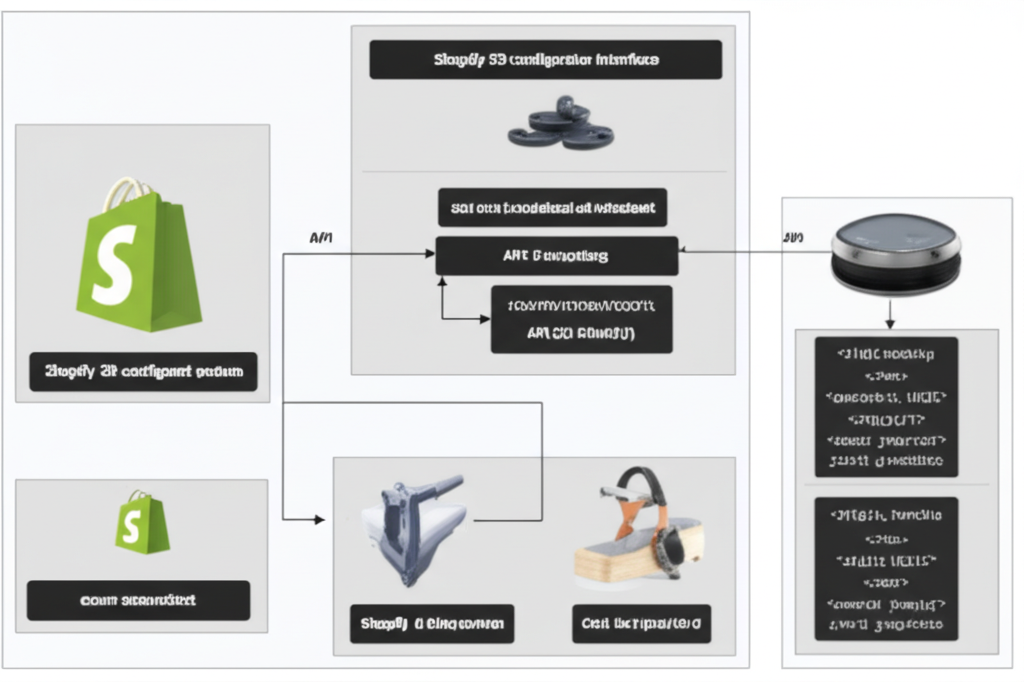
Integration Methods
There are three primary ways to integrate 3D configurators with Shopify, each with different complexity levels and capabilities:
App Installation
Quick setup using Shopify App Store
- • Easy installation
- • No coding required
- • Automatic updates
- • Limited customization
- • Monthly fees
Custom Integration
Direct API integration with theme customization
- • Full customization
- • Better performance
- • No monthly fees
- • Requires development
- • Manual updates
Hybrid Approach
Combination of app and custom code
- • Balanced approach
- • Some customization
- • Easier maintenance
- • Moderate complexity
- • Some limitations
Method 1: App Installation (Recommended for Beginners)
Best For:
Store owners who want quick implementation without technical complexity.
Step 1: Install the VisionThree App
Go to your Shopify Admin → Apps → Visit Shopify App Store
Search for "VisionThree 3D Configurator" and click Install
Accept permissions and complete the installation
Step 2: Configure Your First Product
// Example product configuration
{
  "productId": "gid://shopify/Product/123456789",
  "configuratorSettings": {
    "materials": ["wood", "metal", "fabric"],
    "colors": ["#FF0000", "#00FF00", "#0000FF"],
    "dimensions": {
      "width": { "min": 100, "max": 300, "default": 200 },
      "height": { "min": 50, "max": 150, "default": 100 }
    }
  }
}
Method 2: Custom Integration (Advanced)
Best For:
Developers who need full control over the implementation and user experience.
Step 1: Set Up Development Environment
# Install Shopify CLI
npm install -g @shopify/cli @shopify/theme

# Clone your theme
shopify theme pull

# Create development theme
shopify theme dev
Step 2: Add 3D Configurator Scripts
Add the VisionThree SDK to your theme's layout file:
<!-- In theme.liquid, before closing </head> tag -->
<script src="https://cdn.visionthree.com/v1/configurator.js"></script>
<link rel="stylesheet" href="https://cdn.visionthree.com/v1/configurator.css">

<!-- Initialize configurator -->
<script>
  window.VisionThree = window.VisionThree || {};
  VisionThree.config = {
    apiKey: '{{ settings.visionthree_api_key }}',
    environment: 'production'
  };
</script>
Step 3: Modify Product Template
Update your product template to include the configurator:
<!-- In product.liquid or product-form.liquid -->
<div id="visionthree-configurator"
     data-product-id="{{ product.id }}"
     data-handle="{{ product.handle }}">
  <!-- Configurator will be injected here -->
</div>

<script>
  document.addEventListener('DOMContentLoaded', function() {
    if (window.VisionThree && window.VisionThree.Configurator) {
      new VisionThree.Configurator({
        container: '#visionthree-configurator',
        productId: {{ product.id }},
        onConfigurationChange: function(config) {
          // Update price and add to cart data
          updateProductPrice(config.price);
          updateVariantSelection(config.variantId);
        }
      });
    }
  });
</script>
Step 4: Handle Cart Integration
function updateProductPrice(newPrice) {
  const priceElement = document.querySelector('.price');
  if (priceElement) {
    priceElement.textContent = formatMoney(newPrice);
  }
}

function updateVariantSelection(variantId) {
  const variantInput = document.querySelector('input[name="id"]');
  if (variantInput) {
    variantInput.value = variantId;
  }
}

// Add configuration data to cart
function addConfigurationToCart(configuration) {
  const form = document.querySelector('form[action="/cart/add"]');

  // Add configuration as line item properties
  const configInput = document.createElement('input');
  configInput.type = 'hidden';
  configInput.name = 'properties[_3d_configuration]';
  configInput.value = JSON.stringify(configuration);

  form.appendChild(configInput);
}
Advanced Configuration Options
Custom Styling
/* Custom CSS for configurator */
.visionthree-configurator {
  border-radius: 12px;
  box-shadow: 0 4px 20px rgba(0, 0, 0, 0.1);
  overflow: hidden;
}

.vt-control-panel {
  background: #f8f9fa;
  padding: 20px;
}

.vt-option-button {
  border: 2px solid #e9ecef;
  border-radius: 8px;
  transition: all 0.3s ease;
}

.vt-option-button.active {
  border-color: #007bff;
  background-color: #e3f2fd;
}
Performance Optimization
Lazy Loading
Load the configurator only when needed to improve page speed:
// Load configurator on user interaction
document.querySelector('.configure-button').addEventListener('click', function() {
  loadConfigurator();
});
Model Optimization
- • Use compressed 3D models (GLB format recommended)
- • Implement progressive loading for complex models
- • Cache models in browser storage
- • Use CDN for faster model delivery
Testing & Quality Assurance
Desktop Testing
- • Chrome, Firefox, Safari, Edge
- • Different screen resolutions
- • Performance on slower connections
- • WebGL compatibility
Mobile Testing
- • iOS Safari and Chrome
- • Android Chrome and Samsung Browser
- • Touch interactions
- • Battery usage optimization
Common Issues & Solutions
Issue: Configurator not loading
The 3D configurator container appears but no content loads.
- • Check API key configuration
- • Verify product has 3D model assigned
- • Check browser console for JavaScript errors
- • Ensure WebGL is supported and enabled
Issue: Slow loading times
3D models take too long to load, affecting user experience.
- • Optimize 3D model file sizes
- • Implement progressive loading
- • Use CDN for model delivery
- • Add loading indicators
Issue: Cart integration problems
Configuration data not properly passed to cart or checkout.
- • Verify line item properties are set correctly
- • Check variant ID mapping
- • Test cart AJAX functionality
- • Validate configuration data format
Best Practices
User Experience
- • Provide clear instructions for first-time users
- • Show loading states and progress indicators
- • Enable save and share functionality
- • Implement undo/redo capabilities
- • Add keyboard shortcuts for power users
Technical
- • Use semantic HTML for accessibility
- • Implement proper error handling
- • Add analytics tracking for user interactions
- • Optimize for search engines (structured data)
- • Regular performance monitoring
Maintenance & Updates
Regular maintenance ensures your 3D configurator continues to perform optimally:
Monthly Tasks
- • Review performance metrics and loading times
- • Check for SDK updates and security patches
- • Analyze user interaction data
- • Test on new browser versions
Quarterly Tasks
- • Comprehensive cross-browser testing
- • Performance optimization review
- • User feedback analysis and improvements
- • 3D model optimization and updates
Need Help with Your Integration?
Our technical team can help you implement 3D configurators perfectly for your Shopify store.
Related Articles
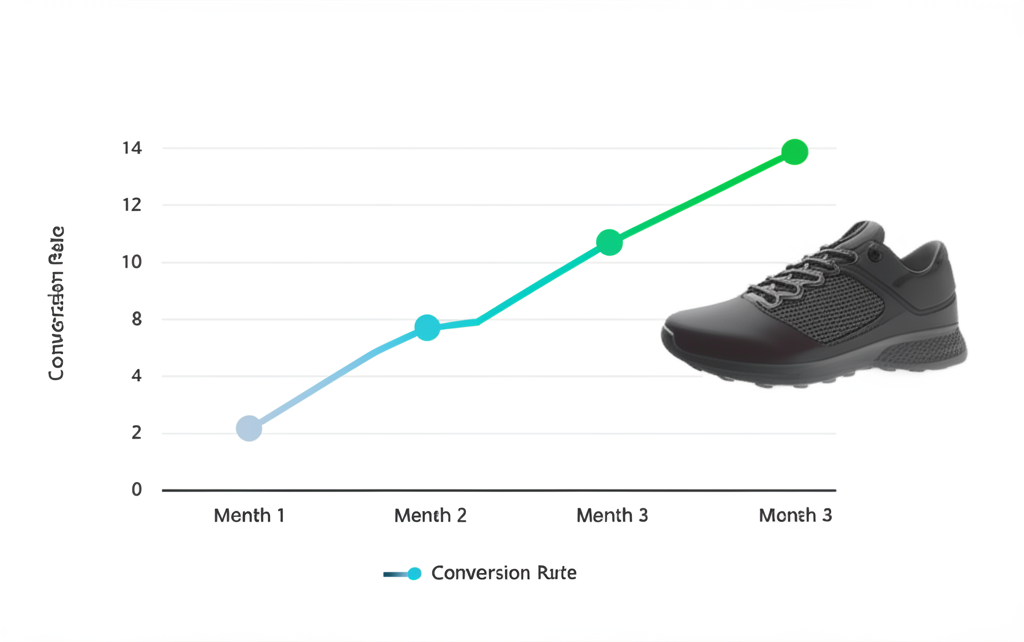
3D Configurators Increased Shopify Conversions by 127%
Real case study showing dramatic conversion improvements with 3D configurators.
Read More →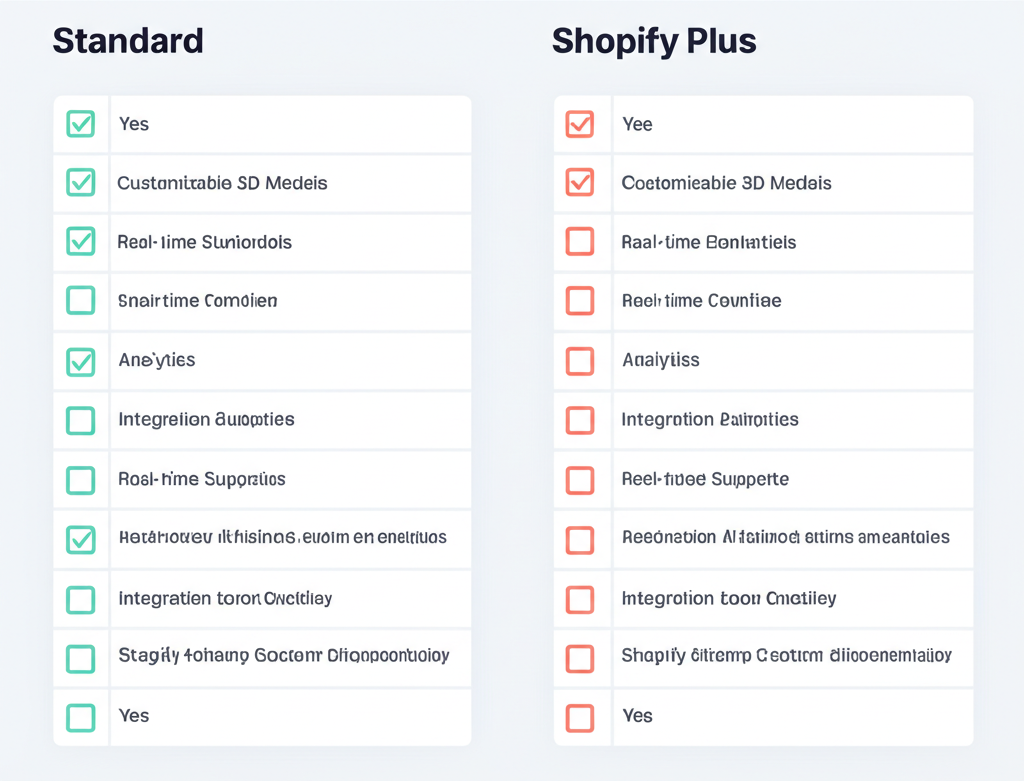
Shopify Plus vs Standard: 3D Configurators
Compare 3D configurator capabilities between Shopify plans.
Read More →
ROI Calculator: 3D Product Configuration
Calculate potential returns from implementing 3D configurators.
Read More →